|
Measuring Sunspot Rotation - by Ricky Leon Murphy:
Back to Solar System
This was my first project years ago for my degree. This project used
photographic data of the Sun to determine rotation of the Sun.
Enjoy...
Using
commercially available products, viewing the Sun safely with the unaided
eye or with photographic equipment can show the surface and its
sunspots. Viewing the changes in sunspots over time can reveal the
rotation speed of the Sun as well as the life span of sunspots. While
the equipment used to view the Sun can be expensive, there are alternate
inexpensive methods available to study the Sun safely. The methods I
used to capture images of the Sun are using a telescope with a solar
filter and a digital camera. With the higher magnification available
from a telescope, it is possible to view very subtle changes and track
the progression of sunspots more accurately. Safety is extremely
important. Viewing the Sun with the unaided eye without protection or
through a telescope without filters can permanently damage the eye. If
you suspect you may have looked at the Sun inadvertently, stop your
solar viewing immediately and consult an eye care specialist.
Viewing the
Sun through a telescope with a solar filter is a very exciting
experience. Of course, you do not need a telescope and a solar filter to
view the Sun and its sunspots. One of the simplest methods of viewing
the Sun is using developed un-exposed color slide film. A roll of slide
film can cost around $4.50 and development of the film can cost an
additional $4.00. Of course, prices vary. Buy your roll of slide film
(any brand will do) and take it to the photo lab to have the un-exposed
film developed. Remember to ask for develop only; asking for slides will
cost extra, and slides are not helpful. What you will get is a very dark
roll of film. Cut the film long enough to cover both eyes when being
held by the hands. Overlay at least three pieces of cut film over each
other. With this film over your eyes, you may look at the Sun safely.
When viewing the Sun without magnification, it is possible to view
sunspots, but only the larger sunspot groups (if there are large groups
to be seen!). To study the rotation of the Sun and the life span of
sunspot groups, this will suffice. A safer method of viewing the Sun is
using a shoebox camera. With a shoebox held length wise, place a white
piece of paper at one end, and punch a pin hole at the other end. Aim
the pinhole towards the Sun, and you will see the Sun displayed on the
white sheet of paper. The problem with this method is the difficulty in
viewing sunspots. Usually this method is best for viewing annular or
total solar eclipses. Viewing the Sun at sunset (or sunrise) may also be
an option since the atmosphere acts as a natural filter, but the disk of
the Sun is so distorted it may not be possible to view sunspot changes.
The safest method of viewing the Sun is viewing the Stanford Solar
Center website (http://solar-center.stanford.edu). This is an excellent
resource for everything solar, and the cost is the fee for your internet
service provider! Of course, it lacks the personal touch and the
excitement of discovery. There are even more advanced methods of viewing
and imaging the Sun. This method uses a very costly Hydrogen Alpha
filter available from specialty companies like Coronado. With the
Hydrogen Alpha filter, it is possible to view the granularities on the
Sun’s photosphere, and more detailed views of sunspots. I have never
looked through a telescope with such a filter in place, but I have seen
breathtaking photographs.
My method of
choice for studying the groupings of sunspots is with a telescope and a
solar filter. There is a benefit to this method: sunspot groups of any
size are visible with a telescope and measurements of sunspot change
will be more accurate since more subtle changes are viewed. Many of us
interested in astronomy may already have a telescope. To make the
telescope ‘solar ready,’ a solar filter must be purchased. Technically
these are called white light solar filters, but catalogs and telescope
retail stores simply call them solar filters. This filter fits over the
objective lens of the telescope. Consult your telescope manual or
telescope retailer to make sure you get the correct size; keeping in
mind the dew shield has a larger diameter than then objective lens. This
is a solar filter:

This
particular model was purchased from Orion Telescopes (www.telescope.com).
Viewing the Sun with the filter in place does not degrade the image at
all, so any magnification may be used to view the sun. While I can
certainly view and photograph the sunspots with high magnification, it
is best to view the Sun as a whole. It is easier to capture the
progression of sunspots across the surface of the Sun using a lower
magnification.
For
documentation purposes, the changes of the Sun’s surface must be drawn
or photographed. I am a very poor artist, so I chose photography as my
method of documentation. Documenting changes using a pencil and paper
will suffice for documenting changes of the sunspot groups – this is how
the Astronomer’s of old documented their observations. Photography is
much faster, and in my opinion, more accurate, especially when capturing
subtle changes in sunspots. Film based camera or digital cameras can be
used when photographing the Sun. For an SLR (single lens
reflex) camera back, a T-adapter is required. The T-adapter
allows the camera to connect directly with the telescope in place of the
eyepiece, making the telescope a very long telephoto lens. This is
called “prime focus” photography, so the image scale will be limited to
the focal length of the telescope. Eyepiece projection uses the
eyepieces magnification scale to view the image – what you see is what
you get. Since I do not own a SLR camera body, I chose to use my
existing digital camera. I would recommend a digital camera over an SLR
camera[i]
for several reasons: CCD technology has caught up with film with regard
to image quality and CCD detectors are more sensitive than film. The
main reason for the recommendation is the instant results that can be
evaluated to ensure the best quality image has been captured. A film
based SLR camera will require development of film which can take hours.
A CCD is a “charged coupled device” and is the
heart of a digital camera. An additional item that is needed is an
eyepiece adapter, shown below with an eyepiece:
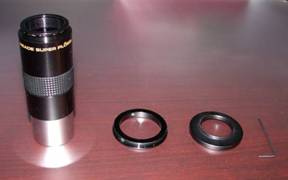
An
eyepiece adapter allows a digital camera to mount on an eyepiece. The
eyepiece of choice is a Meade Super Plossl 32mm (although any eyepiece
will do, as long as the adapter will fit) and the adapter fits in place
of the eye cup. This 32mm eyepiece, when used on my telescope with a
700mm focal length gives a power of 21 (21x)[ii].
The adapter is made by Scopetronix, and is available to fit a variety of
cameras. The adapter next to the hex key screws into the lens of the
digital camera, and that assembly screws into the adapter in the center
of the image.
Unlike
viewing or photographing objects in the nighttime sky, viewing the Sun
(in the day light of course) does not require equatorial mounts, drive
systems, polar alignment or any of those painful to set-up checklists.
The Sun is easily seen, and photography of the Sun, even with the
filter, takes a fraction of a second. My telescope does come with an
equatorial mount, but for studying the Sun, exact alignment is not
required. This photograph shows the telescope, pointed roughly north,
with filters and eyepiece in place:
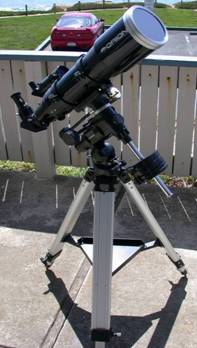
I
have a lovely view of the ocean (as seen by the extreme upper edge of
the photo), but try to ignore that! California weather has given me the
opportunity to view the Sun on a daily basis (with only a few days of
partially cloudy weather). To photograph the Sun, my camera of choice is
a Nikon Coolpix 995 digital camera. This is an excellent consumer grade
camera that is very capable as an astrophotography camera. Since I had
to use the camera to photograph the telescope set-up, a mirror was used
to photograph the camera:
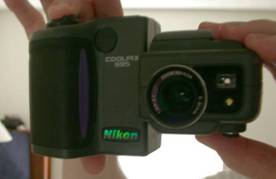
Although it is difficult
to see, the silver circle is threaded to allow the addition of the
eyepiece adapter. Minor changes to the camera should be made prior to
using the camera on the telescope. It is important to turn off the
automatic focusing, and to put the camera into shutter priority mode. By
turning off the automatic focusing, the camera will not search for
something to lock on so focus can be adjusted. When using a digital
camera for astrophotography, the majority of subjects are dim so the
automatic focus will not work. By setting the camera to shutter
priority, the user has the ability to adjust the speed at which the
image is captured. The sun is very bright, even with a filter, so a
shutter speed of 1/500 should be selected (sometimes more or less).
Dimmer objects, like stars, can be photographed with a shutter setting
of 1” (one second) or more. Consulting the owner’s manual of your camera
will give detailed instructions on how to do this.
Prior to
photographing the Sun, it is important to aim the telescope toward the
Sun. Remember, safety is important, so I designed a method to allow for
safely aligning the telescope toward the Sun. This is a two step
process. The first step is to use the shadow of the optical tube:

The
second step is to use the viewfinder[iii]
so the brightest part of the Sun is displayed on the hand:
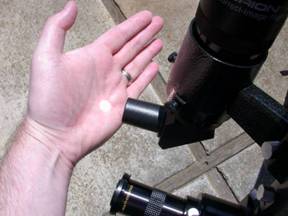
Once aligned using this
safe manner the Sun should be within or very near the field of view when
looking in the eyepiece. With my Nikon camera, and the low power of the
telescope eyepiece, I am able to view the Sun on the LCD screen on the
back of my camera. Once centered and focused, begin capturing images.
You may need to take many photographs at different exposures and focus
to find the right image. A technique I learned as a medical photographer
is called image stacking – the process of reducing the transparency of a
single image, and layering images on top of each other until the total
transparency level is 100%. This technique is also used in Astronomy by
using software used to “register” images for layering automatically (Registar
is one software title that comes to mind, though it is not very good at
stacking the image of the Sun). One good image per day is good enough to
evaluate the changes of sunspots. One other important aspect of daily
photography of the Sun that must be considered is the time of day in
which the Sun is to be photographed. For accuracy, the Sun should be
photographed during the same time everyday. In the length of time to
photograph the Sun (about 2 weeks), the same position in the sky is
about the same time of day – give or take a few minutes. There will
naturally be an error of a few minutes since the best photograph may not
have occurred at the same exact time as the day before. This method is
using sidereal time. Once calculated, the solar rotation, based on
sunspot changes, will be the sidereal rotation. If this had been the
synodic rotation, images would have to be captured when the sunspots are
at the same location on the surface of the Sun, and that would be
useless in our experiment. A single photograph of the Sun is very
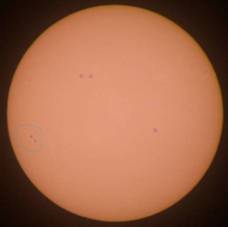
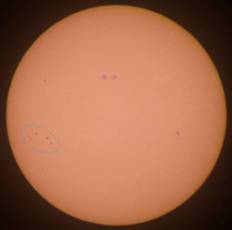
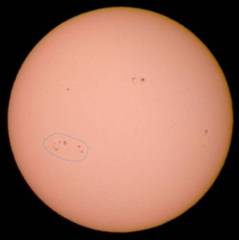
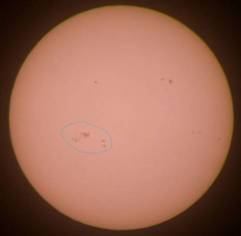
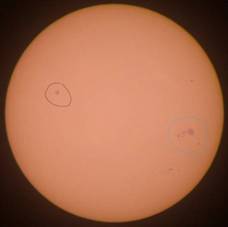
dramatic, as seen below:
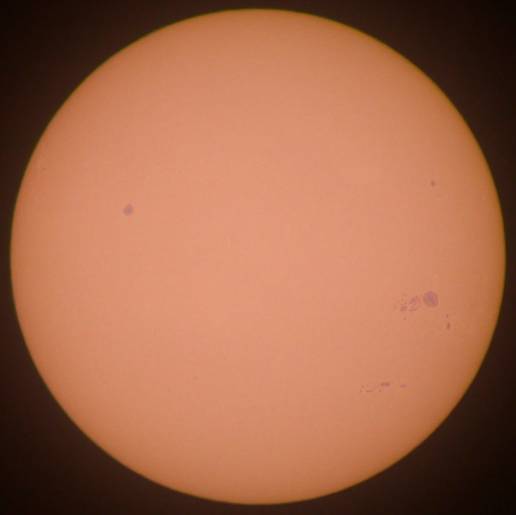
This
photograph was taken on May 4, 2003.
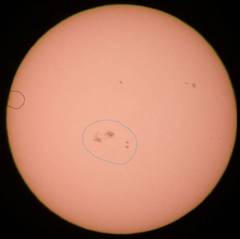
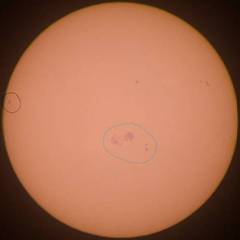
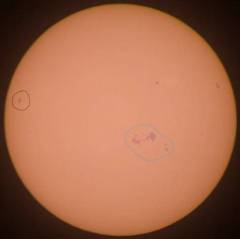
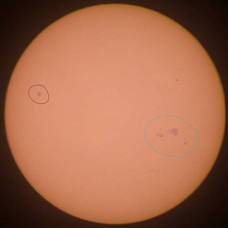
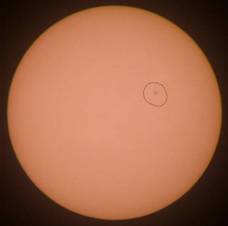
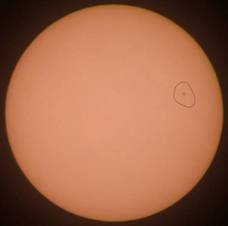
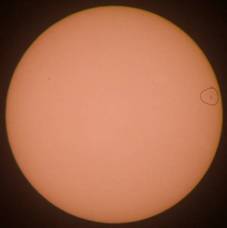
To study changes in
sunspot groups, and determine the rotation of the Sun, we must view the
changes of the Sun’s surface on a daily basis. I have photographed the
Sun over a period of 19 days, and concentrated my attention on two
particular groups of sunspots which, luckily, begin on the extreme left
side of the image and end on the extreme right of the image. The first
group of sunspots is circled in blue, and goes through the most dramatic
changes on a daily basis. The second group of sunspots is circled in
black, and remains somewhat stable throughout the semi-rotation of the
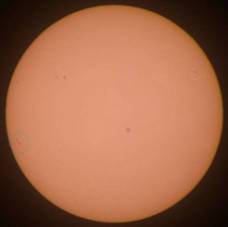
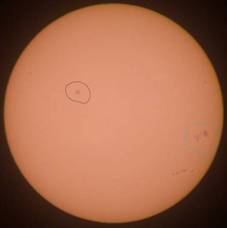
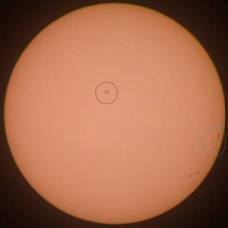
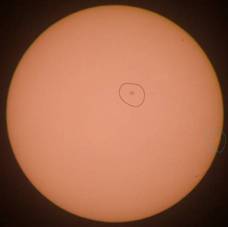
Sun. Each photograph was taken around noon-time on each day:
 |
 |
| 24 April 2003 |
25 April 2003 |
 |
 |
| 26 April 2003 |
27 April 2003 |
 |
 |
| 28 April 2003 |
29 April 2003 |
 |
 |
| 30 April 2003 |
01 May 2003 |
 |
 |
| 02 May 2003 |
03 May 2003 |
 |
 |
| 04 May 2003 |
05 May 2003 |
 |
 |
| 06 May 2003 |
07 May 2003 |
 |
 |
| 08 May 2003 |
09 May 2003 |
 |
 |
| 10 May 2003 |
11 May 2003 |
 |
|
| 12 May 2003 |
|
These 19 images show the
gradual movement of sunspot groups over the Sun’s surface. The first
group (circled in blue) appears on the far left of the 24th
of April image and disappears on the far right of the 7th of
May image. This group remained visible for 14 days, the duration of the
semi-rotation of the Sun. The second group of sunspots (circled in
black) appears on the 30th of April on the far left of the
image, and disappears on the far right on the 12th of May.
This sunspot group remained visible for 13 days – the semi-rotation of
the Sun. Since the Sun is a sphere, multiplying the number of days by
two will give the full rotation of the Sun. Based on the study of the
above images, the solar rotation seems to be about 26 to 28 days,
however the life of the sunspots can only be inferred around 14 days for
the longest lasting spots – although the exact life span of both groups
of sunspots is not certain. Very small sunspot groups appeared and
disappeared in a matter of days, however the very large group remained
for the duration of the semi-rotation, and changed dramatically on a
daily basis. This information is very close to the actual rotation
period and the life of the sunspots based on two sources of information:
the HET602 text book, Universe by Roger Freedman, and the Stanford Solar
Center website (http://solar-center.stanford.edu).
According to the Universe text, the solar rotation at the equator is 25
days, and the rotation near the poles is as long as 35 days. The
groupings of sunspots observed in the images above appear to be above
and below the equator of the sun, and this corresponds to the official
data; however, it is difficult to pinpoint a measurement of sunspot life
since they can vary from hours to months. Since the Sun is spinning, the
shape is more oblate resulting in a more rapid equatorial rotation,
called differential rotation. In order to mentally visualize the equator
of the Sun, I used the Stanford Solar Center website. I was able to
confirm to correct orientation of the photographs, so the rotation is
accurate from left to right. If these photographs were used straight
from the camera without orientation, we would still be able to assess
the same periods for rotation and sunspot life but the rotation would be
from bottom to top (because of the refractors natural ability to invert
the image, and the right angle of the diagonal on the telescope to flip
the image, and the angle of the telescope on my equatorial mount during
the time of day).
Safety in
viewing the Sun is very important. Solar filters must be in place prior
to viewing through a telescope, and the Sun should never be viewed with
the unaided eye. At the Stanford Department of Ophthalmology – for which
I am the Senior Ophthalmic Photographer, we had a case of a young 21
year old man who presented with a history of decreased vision after
viewing the Sun with the un-aided eye. While he looked at the Sun for
just a fraction of a second, the damage was done, and is not
correctable. His vision, with glasses, was measured at 20/80 in both
eyes (that means a normal person is seeing a group of letters at 80 feet
as this young man sees them at 20 feet) – for comparison, normal vision
is 20/20. A color photograph and fluorescein angiogram was performed on
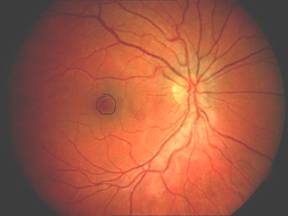
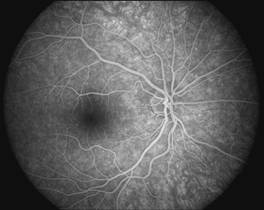
both eyes to document the change. First, we will show a normal color
photograph of the retina, and a frame of a fluorescein angiogram
(different patient):
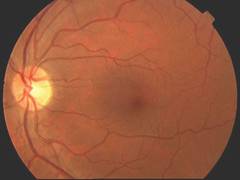 |
 |
Now
for a color photograph and a frame of an angiogram of this young man;
pay special attention to the small yellowish circular area in the very
center of the image (circled in black). This is the solar “burn” on the
macula. Also, note the lack of dye in this same area on the angiogram.
This is the result of “capillary dropout” in the macula area that is
permanent:
There is currently no
treatment for Solar Retinopathy.
This
project has demonstrated that with basic and consumer available
equipment, data can be collected to determine some basic vital
statistics of the Sun. With daily observation of the Sun, it is possible
to measure the rotation period, as well as documenting changes and
determining the life cycle of a group of sunspots. We have learned the
Sun rotates at approximately 26 to 28 days near the equator, and groups
of sunspots can last from a few days to 13 days, sometimes longer
(according to the Universe text, page 406, sunspots can last a few hours
to a few months). We have also confirmed our findings with official
data, and discovered that the variability of rotation speed from our
experiment is a result of differential rotation. We have also learned
that safety is vital when viewing the Sun as damage to the eye is not
correctable. With the appropriate safety equipment, anyone can enjoy
viewing the Sun. A telescope is not necessary to enjoy the views of our
nearest neighbor, but can provide some spectacular views. One can view
the Sun using un-exposed film as a filter, a shoebox camera, or even a
website. For the more serious solar observer, a telescope and a solar
filter should be considered.
References:
Freedman, Roger A.
Universe 6th Edition. W.H. Freeman and Company, 2002
The Stanford Solar
Center. Internet.
http://solar-center.stanford.edu. 2003
Websites of Interest:
Scopetronix: Quality
Astronomy Products -
http://www.scopetronix.com/
Coronado Solar Filters -
http://www.coronadofilters.com/
Orion Telescopes -
http://www.telescope.com
ESA SOHO website -
http://sohowww.nascom.nasa.gov/
Registar Image Stacking
software -
http://www.aurigaimaging.com/
Adobe PhotoShop -
http://www.adobe.com/products/photoshop/main.html
Special note: The transit
of Mercury occurred on May 7, 2003. This transit was not visible in
California so no transit is visible on any photographs captured during
this time.
[i]
Nikon makes an SLR digital camera. Only SLR cameras need a
T-adapter. Digital cameras with integrated lens will require an
adapter to mount to an eyepiece, provided they have a threaded
lens. Such digital camera cannot mount directly to a telescope.
[ii] Telescope power is determined by the
formula: F / f = x; where F is the telescope focal length, f is
the eyepiece diameter, x is the power rating.
[iii] The telescope viewfinder should already
be adjusted to the telescope. Consult the telescope manual on
the process of aligning the viewfinder.
Back to Top |
Back to Solar System |